PNotes: Free Wonderful Sticky Notes Program

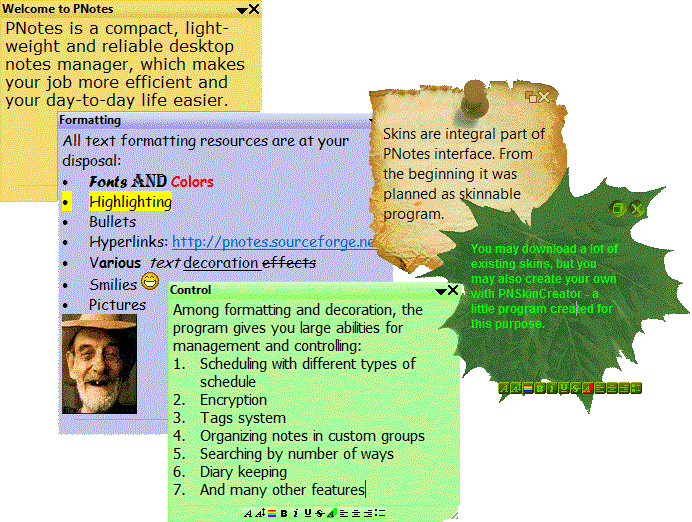
What’s great about PNotes? It’s portable. You can format the text anyway you want. You can have Pictures. You can have bullet points, numbered lists. You can even password protect the notes. It has some pretty good skins at developer’s website.

Here is how I use it. I store the portal Pnotes program at my DropBox cloud storage along with the notes I take and keep. It’s available all of my computers and mobile devices. Wherever I go my Notes follows me.

Download it HERE: http://pnotes.sourceforge.net

Windows 7: Automatically expand Navigation tree to the current folder

Once I learned this option exists, it is a breeze to use Explorer on multi-level sub trees. It’s better then changing sub folder levels in address bar. Once you enable this setting, this is you see it.

image

If you are interested, follow the steps to enable it.

  1. On you Explorer window, click Organize and select Folder and Search options
  2. Check the box for the Navigation pane option Automatically expand to current folder
  3. Click OK to close.

image

Huge Pointer Stick to replace the mouse pointer–Great for presentations

PointerStick is a portable tool that presents on the Windows Desktop a virtual pointer stick, for example for Presentations to highlight the current mouse position and the emphasis on presenting will be better.
The use of the virtual pointer stick is ideal for projectors (Beamer) and larger LED/LCD screens.
# Features:
# Very Small Program
# Low CPU usage
# Adjustable size of Pointer Stick
# Several Pointing-Stick textures (bitmaps)
# Optional alpha transparency
# Optional deactivation by mouse or keyboard input
# Optional translation feature
# Portable
# Multilingual

image

Download it here: http://www.softwareok.com/?seite=Freeware/PointerStick

Outlook: Recover deleted items from any folder (not just Deleted Items folder)

Outlook provides a way to recover items after you have permanently deleted them, including after emptying the Deleted Items folder. Your Exchange server administrator specifies the retention time for permanently deleted items on the Exchange server. After this time has elapsed, you cannot recover the deleted items.

By default, to use the Recover Deleted Items command on the Tools menu, you must be viewing the Deleted Items folder. By modifying the registry, this command is available regardless of which Outlook folder that you are viewing. You can view and recover deleted items, including those items that were permanently deleted by using SHIFT+DELETE, for the folder that you are viewing.

To enable this feature follow the steps below.

  1. Exit Outlook.
  2. Open the Windows registry editor.
  3. Browse to My Computer\HKEY_LOCAL_MACHINE\Software\Microsoft\Exchange\Client\Options.
  4. On the Edit menu, point to New, and then click DWORD Value.
  5. Type the name DumpsterAlwaysOn.

Note Do not type any spaces in the name.

  1. Set the DWORD value to 1.
  2. Restart Outlook.

The Tools menu now has the Recover Deleted Items command for every Outlook folder.

Source: http://office.microsoft.com/en-us/outlook-help/recover-deleted-items-from-any-folder-HA001116528.aspx

Windows 7: Disable wireless when you connect to Wired network & Vice Versa

If you are willing to spend few minutes for this solution, continue reading. It involves firing a batch file based on event log entries using Task Scheduler.

1. Create a batch file named “Wireless_Disable.bat” with the following contents. Open Notepad, copy/paste the following text and save it as above file name.

netsh interface set interface “Wireless Network Connection” Disable

2. Create another batch file named “Wireless_Enable.bat”. Open Notepad, copy/paste the following text and save it as the above filename.

netsh interface set interface “Wireless Network Connection” Enable

3. Open Event Viewer. Click Start Orb/button and type Event Viewer and select the “Event Viewer” application from search results.

4. Expand Windows Logs and select System.

image

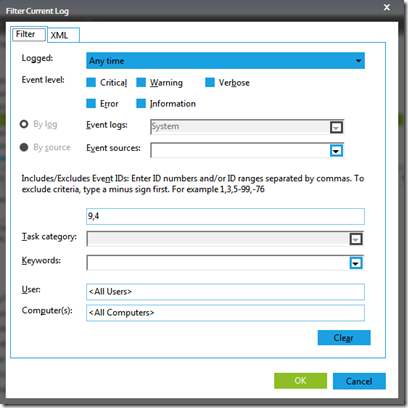
5. I would suggest unplug your network cable from your laptop and plug back in. Click on Filter current log option in Actions pane. In Event ID text box (in the middle), type 9,4 to filter by event id 9 & event id 4. Click OK.
image

6. Find Event Id 9 from the filtered list and double click to open it. Make sure this event is for your correct wired network card. Note down the Source value. In my case it is b57nd60a. Click Close button to close the event properties window.

image

7. Leave the Event Viewer window as it is. Click Start orb/button again and type Task Scheduler. Select Task Scheduler application from search results.

image

8. Click Task Scheduler Library on your left pane. Click on Create Basic Task.. on the Actions pane to create a new scheduled job.

9. On Create a Basic Task section, Type a name (Dock the Laptop) in Name field and type some description about this task. Click Next.

image

9. On Trigger section select When a specific event is logged options and click Next.

image

10. On When an Event is Logged section Select Log as System, Select Source same as you noted down in step 6, and type event ID as 9.Click Next.

image

11. On Action section Select the option Select a program and click Next.

image

12. On Start a Program section click on Browse… button and select the batch file you created in step 1. Click Next.

image

13. Select the check box for Open the Properties dialog for this task.. Click Finish button on Finish section.

image

14. On the task properties dialog box, select the check box for Run with highest privileges and click OK to close.

image

15. Create another basic task by do the steps 7 through 14 again. On Step 9 type task name as “Undock the laptop”. On step 10, type event id as 4 instead of 9.

16. THAT’S IT. Task will automatically fired when you plug and unplug the network cable on your laptop (or dock and undock it).

Try unplugging the network cable from wired network card and watch your wireless network card is enable and vice versa.

Warning: When you change your password for your domain user account you need to update the new password on these two scheduled tasks.
Windows 7: Xp-Mode apps–Pause, hibernate, reboot

XP Mode is Windows 7 is greatest thing since sliced bread. Damn it was more than useful. Here are the few ways I use the XP Mode.

  • Installed legacy apps (that’s the point of this feature, isn’t?)
  • Install the apps that I want to keep for a long time. E.g., you can reinstall your computer and still keep the same VM intact and continue to use. Time to time I find a great free application at http://www.giveawayoftheday.com and I keep it installed in VM.
  • When I connect to work (VPN), I connect using VPN application in VM using XP Mode. Voila`, my VM is connected to work and my laptop is not. I can continue to watch movies or play games, while I am monitoring an application or logs at a server at work.

You know what was missing. We can’t hibernate or pause the VM in XP Mode.  Think about click a single app opens up all the work related applications where it left off.

Found this great PowerShell script based application that does exactly what is missing in XP Mode. Now you can pause, hibernate, reboot and shutdown the XP mode VM quickly and easily. Head over to http://www.orcsweb.com/blog/james/introducing-the-advanced-virtual-pc-controls-for-windows-7/ and get AVPCC.

Pulse: Automatic Wallpaper changer with a twist

Pulse is an application that automatically downloads wallpapers from the web using given keyword. At this time it uses http://rewalls.com to get wallpapers. There are thousands of beautiful wallpapers with different resolutions. Pulse automatically chooses wallpapers with your screen resolution. You can make it to skip wallpapers with lower resolution or to get wallpapers with original size.

image

This is perfect when you don’t want to waste disk space for saving wallpapers, but like to change the wallpaper from Internet. This software is really perfect for Netbooks.

It’s a free software. You can get it from here: http://pulse.codeplex.com/

Windows 7: Change to some cool Start Orbs

With this program (http://www.door2windows.com/windows-7-start-button-changer-change-your-windows-7-start-button-with-one-click/) you can change the Windows 7 Start Orb or button something cool.

image

1. Download the program from above link and save the program to known location.

2. Download some cool Start Orbs from here: http://browse.deviantart.com/customization/skins/windows7/startorbs/

3. Right click on the downloaded file named “Windows 7 Start Orb Changer.exe” & run as Administrator.

4. Click Change button and select your favorite downloaded Start Orb.

Enjoy.